Announcing ZStack v0.9 RC2
Hello everyone, I am Frank Zhang, the architect of ZStack. Today I am happy to announce that ZStack v0.9 is in the release cycle. Today we release 0.9 RC2 for you test. In this release, ZStack introduces two new features:
Ceph Integration
Beginning at this version, ZStack supports Ceph as backup storage and primary storage. To leverage the advantages of Ceph, users should use a Ceph cluster for both backup storage and primary storage in the same zone; by doing so, there will be no data copy between backup storage and primary storage when users perform operations like creating VM, creating image, creating a data volume from an image, all are done through COW(copy on write).
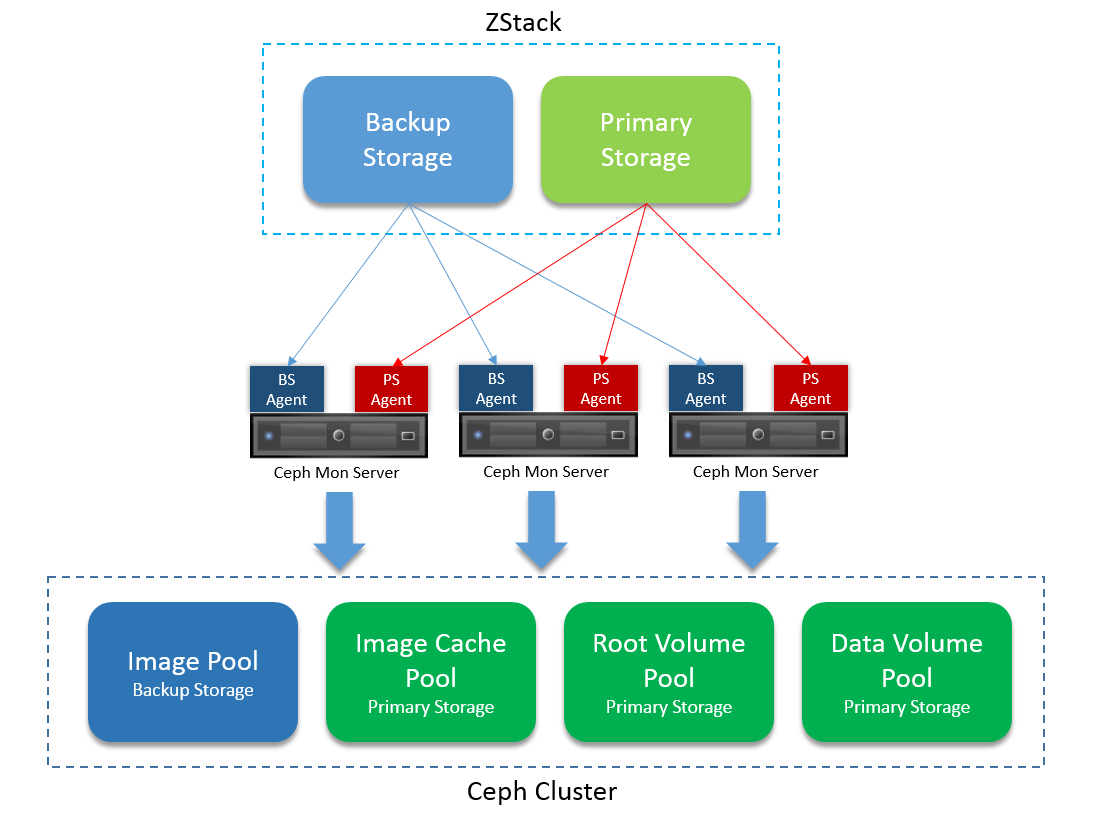
ZStack interoperates with Ceph by deploying agents on Ceph mon servers. Users can dynamically add/remove a Ceph mon server into/from ZStack.
Ceph Backup Storage
Ceph backup storage only works with Ceph primary storage
Given the a main advantage of using Ceph is COW, Ceph backup storage is designed to only work with Ceph primary storage. Because the Ceph backup storage and primary storage use the same Ceph cluster, users should not attach a Ceph backup storage to multiple zones. The best practice is to use a Ceph cluster for both backup storage and primary storage in the same zone. That is to say, you CANNOT use Ceph backup storage with primary storage of NFS, local storage, ISCSI.Add through UI

- select the type 'Ceph'
- input IP/hostname of a Ceph mon server
- input SSH user name of the Ceph mon server
- input SSH password of the Ceph mon server
- click button 'Add'
- repeat steps 3 ~ 5 to add other Ceph mon servers
- click button 'Next'
Add through CLI
You can use AddCephBackupStorage to add a Ceph backup storage. For example:
>>>AddCephBackupStorage name=ceph monUrls=root:password@192.168.0.123,root:password@192.168.0.124,root:password@192.168.0.125
The monUrls is a list of string containing Ceph mon server information, which is in format of:
ssh_username:ssh_password@mon_server_ip:[ssh_port][/?monPort=ceph_mon_port]
ssh_username, ssh_password, mon_server_ip are mandatory while ssh_port and ceph_mon_port are optional. ceph_mon_port is
the Ceph mon server port which is default to 6789. A full example of monUrl is root:password@192.168.0.123:22/?monPort=6789.
Specifying the pool
AddCephBackupStorage receives an optional parameter poolName which allows you to specify an existing
Ceph pool for the backup storage. If the parameter is provided, ZStack will use the pool instead of creating a new one;
if the pool is not existing, an error will be raised and the backup storage will fail to be added. If the parameter is omitted,
ZStack will automatically create a new pool with the default Ceph pool setting.
You can use this feature to create a well-tuned Ceph pool for the backup storage.
Dynamically add new Ceph mon servers
You can use AddMonToCephBackupStorage to add new Ceph mon servers to a Ceph backup storage:
>>>AddMonToCephBackupStorage uuid=d914841733fa499c9dc6d63ea339469d monUrls=root:password@192.168.0.123,root:password@192.168.0.124,root:password@192.168.0.125
Dynamically remove Ceph mon servers
You can use RemoveMonFromCephBackupStorage to remove Ceph mon servers from a Ceph backup storage:
>>>RemoveMonFromCephBackupStorage uuid=d914841733fa499c9dc6d63ea339469d monHostnames=192.168.0.123,192.168.0.124
The monHostnames is a list of IPs of mon servers that you want to remove.
Query
You can use QueryCephBackupStorage to query Ceph backup storage:

Ceph Primary Storage
The Ceph primary storage works with both SFTP backup storage and Ceph backup storage.
Add through UI
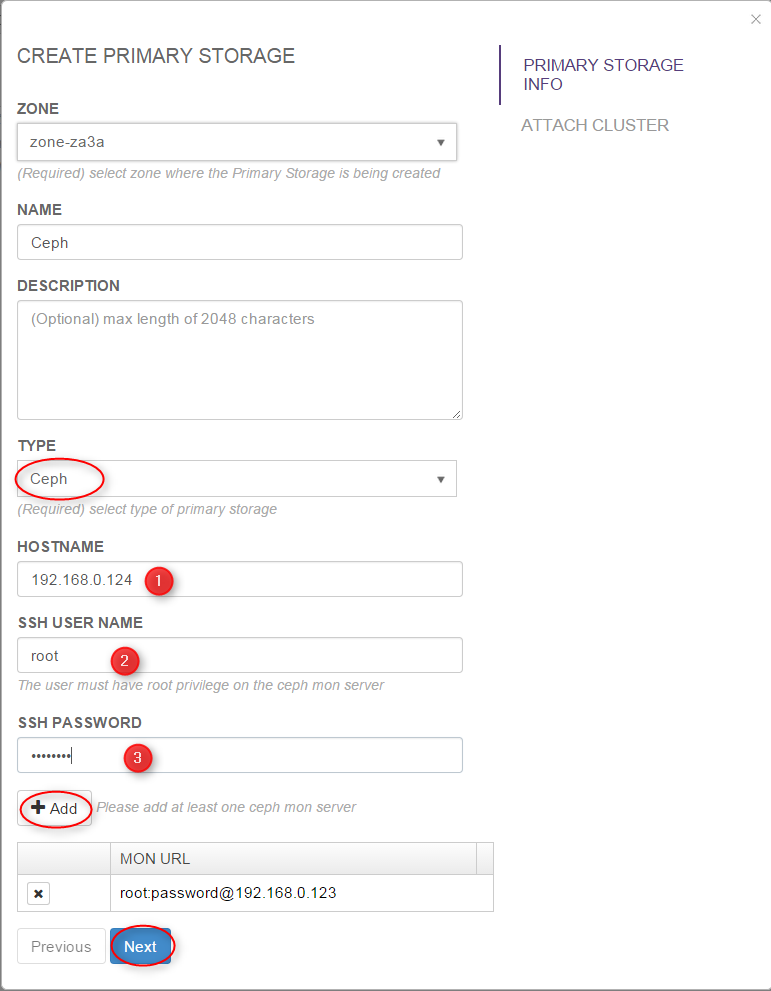
- select the type 'Ceph'
- input IP/hostname of a Ceph mon server
- input SSH user name of the Ceph mon server
- input SSH password of the Ceph mon server
- click button 'Add'
- repeat steps 3 ~ 5 to add other Ceph mon servers
- click button 'Next'
Add through CLI
You can use AddCephPrimaryStorage to add a Ceph primary storage. For example::
>>>AddCephPrimaryStorage name=ceph zoneUuid=d914841733fa499c9dc6d63ea339469d monUrls=root:password@192.168.0.123,root:password@192.168.0.124,root:password@192.168.0.125
The monUrls is a list of string containing Ceph mon server information, which is in format of:
ssh_username:ssh_password@mon_server_ip:[ssh_port][/?monPort=ceph_mon_port]
ssh_username, ssh_password, mon_server_ip are mandatory while ssh_port and ceph_mon_port are optional. ceph_mon_port is
the Ceph mon server port which is default to 6789. A full example of monUrl is root:password@192.168.0.123:22/?monPort=6789.
Specifying pools
AddCephPrimaryStorage receives three optional parameters imageCachePoolName, rootVolumePoolName, dataVolumePoolName
all of which allow you to specify existing Ceph pools for the primary storage. If the parameters are provided, ZStack will use the existing pools instead of creating new ones;
if the pools are not existing, an error will be raised and the primary storage will fail to be added. If the parameters are omitted,
ZStack will automatically create new pools with the default Ceph pool setting.
You can use this feature to create well-tuned Ceph pools for the primary storage. You can choose to only specify parameters(e.g. rootVolumePoolName) for existing pools
you want to use, and let ZStack to automatically create the rest.
Dynamically add new Ceph mon servers
You can use AddMonToCephPrimaryStorage to add new Ceph mon servers to a Ceph primary storage:
>>>AddMonToCephBackupStorage uuid=d914841733fa499c9dc6d63ea339469d monUrls=root:password@192.168.0.123,root:password@192.168.0.124,root:password@192.168.0.125
Dynamically remove Ceph mon servers
You can use RemoveMonFromCephPrimaryStorage to remove Ceph mon servers from a Ceph primary storage:
>>>RemoveMonFromCephPrimaryStorage uuid=d914841733fa499c9dc6d63ea339469d monHostnames=192.168.0.123,192.168.0.124
The monHostnames is a list of IPs of mon servers that you want to remove.
Query
You can use QueryCephPrimaryStorage to query Ceph primary storage:

Elastic Load Balancer
Beginning at 0.9, ZStack supports the elastic load balancer. Details can be found at User Manual - Elastic Load Balancer
Seamless Upgrade
Pay attention to the virtual router upgrade instructions at the end
To support the elastic load balancer, you need to upgrade the virtual router VMs in your current ZStack setup. Please do read the virtual router upgrade instructions at the end of the upgrade chapter.Backup Database
Before performing any upgrade instructions, please backup the current database. This is very IMPORTANT! Though ZStack will automatically backup the current database during upgrade, we strongly recommend you to manually backup the database in case any error happens. You can backup the database following:mysqldump -u root -proot_password --host mysql_ip --port mysql_port zstack > path_to_db_dump.sqlUpgrade by quick script
If you have only one management node, you can upgrade it by ZStack's installation script:
zstack-ctl stop_node
mkdir -p zstack-0.9-rc2
cd zstack-0.9-rc2
wget http://download.zstack.org/releases/0.9/rc2/zstack-install.sh
wget http://download.zstack.org/releases/0.9/rc2/zstack-all-in-one-0.9.0-rc2.tgz
bash zstack-install.sh -u -f zstack-all-in-one-0.9.0-rc2.tgz
Be patient for a few minutes, the script will upgrade the database, management node, zstack-cli, zstack-ctl and zstack-dashboard.
Upgrade by zstack-ctl
1. Upgrade the first management node
Perform below instructions on one of your management node:
mkdir -p zstack-0.9-rc2
cd zstack-0.9-rc2
Install zstack-ctl if you are using 0.6 version
wget --no-check-certificate https://download.zstack.org/releases/0.7/rc2/zstackctl-0.7.tar.gz /var/lib/zstack/virtualenv/zstackctl/bin/pip install --ignore-installed zstackctl-0.7.tar.gzwget http://download.zstack.org/releases/0.9/rc2/zstack.war
zstack-ctl upgrade_management_node --war-file zstack.war
2. Upgrade the database
Make sure you have backup the current database following instructions on the top of this page. Then perform:
zstack-ctl upgrade_db
You can start the node now if you only have one management node
If you have only one management node, you can runzstack-ctl start_node3. Upgrade other management nodes
If you have management nodes running on remote machines, run below commands for each node
zstack-ctl upgrade_management_node --war-file path_to_the_war --host remote_host_ip
4. Upgrade UI
Stop UI
If you are using 0.6, stop the UI by/etc/init.d/zstack-dashboard stop; for 0.7 and 0.8, stop the UI by zstack-ctl stop_ui
Upgrade your UI on local machine by:
zstack-ctl install_ui
or
zstack-ctl install_ui --host remote_machine_ip
if the UI is installed on a remote machine.
5. Start management nodes
Now all your management nodes have been successfully upgraded to the 0.8 RC2. You can start them by zstack-ctl start_node and
zstack-ctl start_node --host remote_host_ip
Agents will be automatically upgraded after starting management nodes
You don't need to bother with agent upgrade; they will be upgraded after management nodes reconnect them.6. Start UI
Now you can start the UI by zstack-ctl start_ui on the local host or zstack-ctl start_ui --host remote_host_ip on the remote host.
7. Upgrade Virtual Router
Upgrade running virtual router VMs
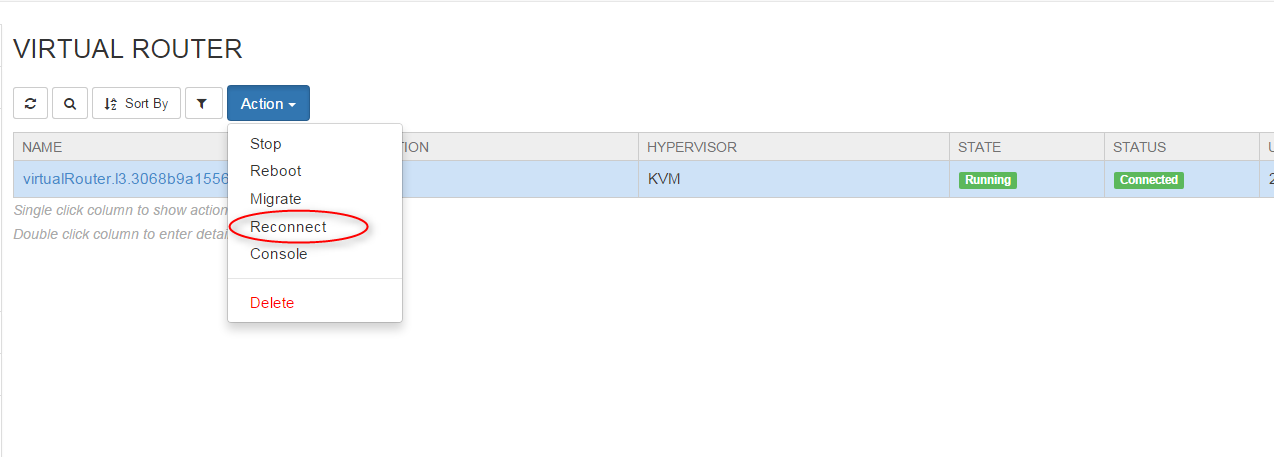
- select the virtual router VM
- click button "Action"
- click "Reconnect"
After reconnecting, the virtual router VM will be upgraded to the latest version.
Upgrade virtual router image and virtual router offering
- add the 0.9 virtual router image http://download.zstack.org/releases/0.9/rc2/zstack-virtualrouter-0.9.0-rc.qcow2 to the backup storage:
update the existing virtual router offering to the new virtual router image by CLI
UpdateVirtualRouterOffering uuid=vr_offering_uuid imageUuid=new_image_uuid
You cannot create new virtual router VMs if you don't upgrade the virtual offerings
If you don't upgrade existing virtual router offerings, new virtual router VMs will fail to be created because the old 0.8(or 0.7, 0.6) image doesn't contain the agent required by the ZStack 0.9. You can use above CLI command to update existing offerings, or simply delete them and create new ones.Bug Report
If you find any bugs, please open a ticket on GitHub